×
BSL-map
Home Facebook Pinterest Twitter RSS


Tuesday, March 12, 2024


15 Easy To Pack Travel Snacks

Planning a trip? Don't forget to pack smart with snacks that resist mess and thrive at room temperature! We understand the importance of staying fueled and satisfied during your travels, and that's why we've compiled a list of easy-to-pack snacks that are perfect for on-the-go adventures. With endless options, feel free to pack your own favorites and customize your snack lineup. 


15 Easy To Pack Travel Snacks


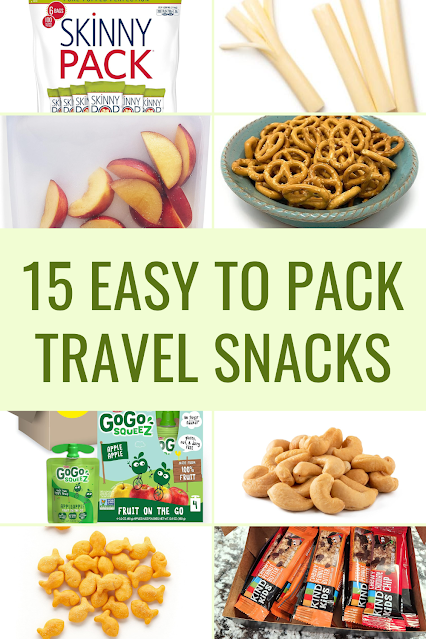
1. Trail Mix: A perfect blend of nuts, dried fruits, and chocolate for sustained energy. Most times we grab pre packaged version as we always have those in our home. You can always create your own trail mix.

2. Fresh apples and mandarin oranges (clementines): They withstand travel and provide a refreshing break. We love to pack grapes and cherry tomatoes (my personal favorite), make sure to wash them before you leave.

3. Beef jerky: High in protein, minimal mess, and ideal for on-the-go munching.

4. Granola bars: We personally love the KIND brand and have included them in Nikolai's past lunches. KIND Kids chewy granola bars have a taste kids will love,100% whole grains and no artificial flavors, colors or preservatives.

5. Fruit Strips: They are natural fruit strips which are delicious flavor of real fruit into portable strips. We get ours from Amazon.

6. Fruit snacks: Portable, and made of real fruits which are bursting with delicious taste. We get ours here.

7. Pretzels, crackers, popcorn, and veggie chips: Crispy, satisfying snacks for a delightful crunch. I personally love the SkinnyPop popcorn. Nikolai and my hubby love the Pirate's Booty.

8. Goldfish crackers: This is another family favorite no matter how old we are.

9. Animal Crackers: A fun and tasty treat for all ages, enjoy identifying the animals before munching. This is my hubby's personal favorite.

10. Applesauce: GoGo Squeez Applesauce pouches offer mess-free convenience with various flavors. I have included this to Nikola's lunchbox so many times when we have those low on grocery days (dreading to go grocery shopping days). This brings back memories. This has been our must pack travel snack ( especially to theme parks) as our family love it! 

11. Chex Mix: Available both pre-packaged and easy to make at home.

12. Nuts: A protein-packed option for non-allergy sufferers; almonds, cashews, pecans, peanuts and more.

13. Cheese Sticks: An easy-to-eat dairy option; use ice packs to keep them cold.

14. Cheese & Cracker Dips: These cheese and crackers snack packs are individually portioned and do not require refrigeration, making them a perfectly portable, go-anywhere option.

15. Freeze Dried Fruit: Enjoy a variety like dried strawberries, pears, pineapple, apples, mango and more.

We also love using reusable bags for snacks, and Stasher reusable silicone bag is one of our favorites. Remember to pack a cooler for perishables like yogurt, cheese and cut fruits.

Gear up for a seamless travel experience with these mess-free, room-temperature-friendly snacks! From trail mix to cheese and crackers, these choices strike the perfect balance between convenience and deliciousness. Whether you're navigating winding roads or taking in scenic views, these snacks ensure you stay fueled and focused on the adventure ahead. Pack smart, snack smarter, and savor every moment of your journey!

Disclaimer: All the items mentioned in this post are personally used and loved by us. We believe in sharing genuine recommendations based on our positive experiences. This post is not sponsored, and the opinions expressed are entirely our own. We hope you find these suggestions helpful for your travels and enjoy the mentioned products as much as we do!
 
Continue Reading »

Tuesday, March 5, 2024


DIY Homemade Lunchables : Quick & Easy Tips

While store-bought Lunchables offer taste and convenience on the go, the experience becomes even better when you craft your own. In just a few minutes, personalize your lunchbox with your favorite foods or cater to specific dietary preferences. With complete control, your DIY Lunchables can be the freshest, most delicious, and even more cost-effective than store-bought options. Take an extra minute to cut them into fun shapes, add a touch of decoration, and arrange them neatly in your lunchbox for a meal that's both tasty and visually appealing.

DIY Homemade Lunchables : Quick & Easy Tips


Why DIY Homemade Lunchables?


  • Customization: One of the main advantages of making your own lunchables is the freedom to choose what goes into them. Tailor your meal to fit your dietary preferences, ensuring a healthier and more enjoyable experience.
  • Cost-Effective: Creating your lunchables can be more budget-friendly than purchasing pre-packaged options. Buying ingredients in bulk allows you to save money while also reducing single-use packaging waste.
  • Freshness: Enjoy the satisfaction of using fresh and quality ingredients. This not only enhances the taste but also ensures that you are consuming wholesome, nutritious foods.

Ingredients:

Protein: Start with a base of your favorite protein – think deli meats, chicken nuggets, or even tofu for a vegetarian option.

Cheese: Choose a variety of cheeses such as cheddar, mozzarella, or Swiss. Cube, slice them or cut into cute shapes for easy snacking. 

Crackers or Bread: Include a selection of crackers, breadsticks, or even mini pitas.

Fresh Vegetables: Add color and crunch with fresh vegetables like cherry tomatoes, cucumber slices, or baby carrots.

Dips and Spreads:
Elevate your lunchable by including hummus, guacamole, or your favorite dip. Small containers or compartments work well for keeping them separate.

Fruits: Incorporate sweetness with fruit slices or berries. Grapes, apple slices, or melon cubes are some choices.

Assembly Tips:


Bento Boxes: Invest in a bento box or compartmentalized container to keep each component separate and visually appealing. Some of our favorite lunchboxes are: Easylunchboxes, Planetbox, Bentgo Kids and more.

Portion Control: Be mindful of portion sizes to create a balanced and satisfying meal.

Variety is Key:
Rotate your choices to prevent lunchtime boredom. Experiment with different combinations to discover your favorite mix.

Temperature Considerations: If you're packing lunchables for school lunch or work, consider using an insulated lunch bag or adding an ice pack to keep items fresh.

We have packed many DIY Lunchables over the years, and the joy of crafting our personalized meals never gets old. If you're ready to take control of your lunchbox experience, check out more ideas and tips HERE. 

Here's to delicious, customizable lunches that fit your taste, budget, and style! 


Continue Reading »

Tuesday, February 20, 2024


5 Benefits of Thermos for Hot Lunch + 30 Lunch Ideas

Happy New Year 2024! Time flies and it's almost March. Since Nikolai is in college, we still need to pack lunches for our selves. Hubby and I love hot lunches and we are using Thermos containers to keep our lunches hot. We have the larger Thermos food containers, but at times I'll still use Nikolai's old ones, lol. I'm sure these Thermos containers can last for a lifetime with proper care.


Let's explore the advantages of packing hot lunches in a Thermos.

1. Preserving Heat for Hours: The primary function of a thermos container is to keep its contents at the desired temperature. Whether it's piping hot soup, a savory stew, or leftovers from dinner, a quality thermos can maintain the heat for hours. 

2. Versatility in Meal Options: Thermos containers provide the flexibility to pack a wide variety of hot meals. From pasta dishes to hearty soups and chili, the options are nearly limitless. This versatility allows you to diversify your lunch choices. I'll share what we usually pack in ours at the bottom of this post.

3. Cost-Effective and Eco-Friendly: Investing in a reliable thermos container is a cost-effective choice in the long run. By packing your hot lunch, you can significantly reduce the need to purchase takeout meals. Additionally, embracing reusable containers aligns with eco-friendly practices, contributing to a more sustainable lifestyle by minimizing single-use packaging waste.

4. Healthier Eating Habits: Bringing your own hot lunch allows you to have greater control over your meal choices. You can focus on incorporating nutritious ingredients and balanced portions, promoting healthier eating habits. 

5. Time-Saving Convenience: The convenience of using a thermos container extends beyond just preserving heat. Packing a hot lunch in the morning saves valuable time during busy workdays. Skip the lines at lunch spots or microwaves in your work place.

5 Benefits of Thermos for Hot Lunch + 30 Lunch Ideas


Here are 30 Hot Lunch Ideas for Thermos:
  1. Pasta
  2. Mac and Cheese
  3. Soup
  4. Grilled Cheese
  5. Pizza (cut to fit)
  6. Chicken Nuggets
  7. Bagel Bites
  8. Mashed Potatoes
  9. Ravioli
  10. Meatballs
  11. Chili
  12. Gyoza
  13. French Toast Sticks
  14. Leftovers like Casserole, Steak, Chicken, BBQ Pork, etc
  15. Fish Sticks
  16. Scrambled Eggs
  17. Pancakes
  18. Sausages
  19. Taco Meat (include tortilla wraps or taco shells on the side)
  20. Fried Rice
  21. Fried Noodles
  22. Pot Roast
  23. Quesadilla
  24. Spaghetti
  25. Jambalaya
  26. Red beans or black beans and rice
  27. Gumbo
  28. Chicken Curry
  29. Tortellini
  30. Ramen noodles and more
In conclusion, making the switch to using a thermos container for your hot lunch is a small adjustment with big advantages. From financial savings to healthier eating habits and the joy of enjoying a hot, homemade meal anywhere, the benefits are undeniable.

Continue Reading »

Wednesday, November 1, 2023


How to Make A Thanksgiving School Lunch With Cookie Cutter

Every year, the Thanksgiving holiday brings with it a whirlwind of festivities and celebrations, but for our family, it holds a double significance. That's because Thanksgiving Day marks the birthday of our son, Nikolai, who was born almost nineteen years ago. While our Thanksgiving is always a time of joyful gatherings and party preparations, creating a festive turkey-themed school lunch has often taken a backseat in the midst of all the excitement.

Unable to find a turkey shaped cookie cutter? No problem! I fortunately remembered an idea I had seen on Pinterest using a hand shaped cookie cutter for a turkey! Here is what I came up with.

How to Make A Thanksgiving School Lunch With Cookie Cutter


In this bento school lunch:
  • Turkey shaped sandwich (cut using a hand shaped cookie cutter), sweet peppers for feather (free hand cut), icing eyes, sweet red pepper wattle, yellow sweet pepper beak and cheddar feet.
  • Bugles.
  • Cucumber slices with a turkey cupcake pick.
  • Seedless red grapes and strawberries. This lunch is packed in an Easylunchboxes container.
You can find more Thanksgiving school lunch ideas that I've created over the years here.
As we wrap up our journey through creating the perfect Thanksgiving turkey school lunch, remember that it's not just about the food; it's about the love and effort you put into it. These festive lunches can create wonderful memories and add a touch of magic to the Thanksgiving season. Happy Thanksgiving and happy lunch-making! πŸ¦ƒπŸ‚πŸŽ‰
Continue Reading »

Tuesday, October 3, 2023


Easy Pumpkin Pancake Muffins Recipe : A Delicious School Lunch Treat

As you may already know, fall is my favorite time of year. I love the striking colors of the leaves and the cooler temperatures. Of course, it is also the season of pumpkin.

We found some pumpkin pancake and waffle mix during a recent visit to our grocery store and my wonderful hubby made some pancakes with it for breakfast the other day. I used the same mix and made some of our favorite pancake muffins! These bite-sized pancake muffins are not only delicious but also quick and easy to prepare.

I love the idea of baking several batches at a time and freezing the extras for those super busy mornings when we need to grab and go. These particular ones were baked the day before and I'd left some out for the next morning, the rest went into the freezer. They are very simple to make, and you get the ease of a muffin with the deliciousness of a pancake. They make for a portable, nutritious, and tasty treat.

Easy Pumpkin Pancake Muffins Recipe : A Delicious School Lunch Treat

Ingredients:
  • 2 cups Pumpkin Pancake mix
  • 1 egg
  • 1 cup milk
  • 1/2 cup pure maple syrup
  • Pam non-stick cooking spray or muffin cups.
Instructions:
  1. Preheat oven to 350ΒΊ.
  2. In medium bowl, stir together pancake mix until moistened. Do not over-mix.
  3. Spoon batter into greased or paper lined muffin pan, filling ¾ full.
  4. There is enough batter to fill one dozen muffin wells.
  5. Bake at 350ΒΊ for 13-15 minutes or until a toothpick inserted into center comes out clean.
  6. Enjoy!!
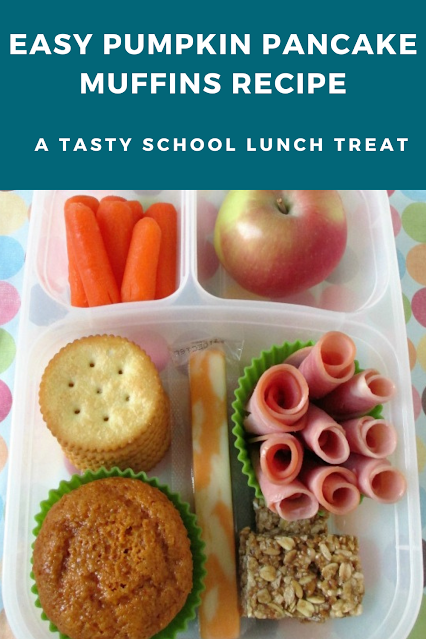
In this school lunch: A pumpkin pancake muffin, string cheese, granola bar, crackers, nitrate free ham roll-ups in my favorite silicone cup, organic baby carrots and an organic apple. Packed in an Easylunchboxes container.

Happy baking, and happy fall season!


Continue Reading »

Tuesday, September 26, 2023


How to Create Halloween Themed Lunches with Cookie Cutters - Spooktacular Creations

Halloween is just around the corner and what better way to celebrate than by adding some spooky flair to your kids lunchbox? In this post I will share several Halloween themed lunches that I've created with cookie cutters. Here is a link to many more Halloween themed lunches.

Here are some supplies that you may need:

  • Cookie cutters in various Halloween shapes (bats, ghosts, pumpkins, cats, and witches, to name a few).
  • Fresh ingredients for your desired lunch, such as sandwiches, fruits, vegetables, and cheeses.
  • Condiments and spreads (cream cheese, ketchup, honey, etc.). We usually use honey as our food 'glue'.
  • Cute food picks or food-safe markers.
  • A dash of creativity and a spooky spirit!

How to Create Halloween Themed Lunches with Cookie Cutters - Spooktacular Creations

Below is how I created these four lunches.


In this lunch: Main compartment contains a Jack-O-Lantern sandwich and a baby seedless cucumber. For the Jack-O-Lantern I used a two sided cutter to cut the shape of the components and then used the other side for the cut-outs only on the top slice. A bit of crust serves as a stem. I used our lettering cookie cutters to leave a faint (spooky?) BOO impression on the cucumber. In the upper right section there is a mandarin orange with a small celery stick as a pumpkin and stem and below them are some strawberries. In the center I included some fruit snacks. Packed in our leak-proof Yumbox.


In this lunch: For these I used my larger bat shape cutter and added eyes and mouth cut from fruit leather ( a dab of honey to glue the features). Above these bat sandwiches there are organic carrots and celery sticks with a BOO pick, and to the left of those are some bat shaped pieces of mild cheddar and mozzarella cheese. I used the same small cutter for both the cheese and the cut-out of the apple half. In the center are Annie's organic fruit snacks. Perhaps dark pumpernickel bread might have been more typically bat like, but what I used here seems to make the little red eyes a bit more startling. This lunch was packed in a Planetbox Rover.


In this lunch: For this lunch I have a sandwich topped with a mozzarella cheese ghost which I shaped with a cutter and decorated with bits of raisin ( tiny dab of honey used as glue for the features), and using another small cutter, I included a tiny headstone shaped piece of crust and also a "BOO" pick. On the right side I have included some strawberries, cucumber slices, and some chunks of cheese. Packed in our leak-proof Yumbox.


In this lunch: Above a bagel with cream cheese filling I put a flying witch on a broom. The witch was shaped with a cutter, the hat was made from nori, and the broom from a bread crust. For the sides I included some apple slices, some green grapes and some M&Ms. Packed in our leak-proof Yumbox.

These lunches were all very easy and quick to make, but most of all they were really FUN to make!
Continue Reading »

Wednesday, September 20, 2023


Halloween Ghost Pizza with Recipe

Any pizza lovers out there? My hubby and Nikolai love pizza and they can eat them served hot or cold. We baked a batch and saved some for the next day's lunch.


Ingredients:
  • One tube refrigerated Pillsbury biscuit dough
  • 1 bottle of organic pasta sauce
  • 2 slices part skim mozzarella cheese (for the ghosts)
  • Sliced olives
Directions:
  1. Pre-heat oven to 400°.
  2. Roll or pat biscuits into 2-1/2 in. circles. Place on greased baking sheet or non-stick sheet. I love our baking sheet which has wide handles!
  3. Add pasta sauce on top of biscuits.
  4. Bake for 8-10 minutes or until edges are lightly browned and remove.
  5. Using a small ghost-shape cookie cutter, cut a ghost out of each cheese slice.
  6. Immediately place a ghost over each pizza; add pieces of olives for faces.
  7. Pack in his Laptop Lunches after the pizzas cool down.
You can recreate something similar with different cheese cut outs for sure. I've also made Pizza Mummy and Jack-O-Lantern Pizza with English muffins that you can find here.


Continue Reading »

Categories

Archives

Sponsors & Affiliates

Grab This Fun Book!


My Heroes on Vacation